#1: Have some!
…
updates, rants & everything…
#1: Have some!
…
- It’s been a busy year and some of the things I’ve been involved in warrant writing about. So here we go!
We’ve moved to a new home and it’s been quite a project. But let’s settle for the really important stuff: The new home network. ![]() Having bought into the building just early enough, we took the opportunity to adjust the wiring specifications just slightly from what was luckily already a pretty decent setup. There were plenty of electrical outlets, coax cable in every room and phone lines part of the plans. We only added a few electrical outlets so we would never have to run any power cables around corners (I hate cable clutter!) and then went to town on the data cabling:
Having bought into the building just early enough, we took the opportunity to adjust the wiring specifications just slightly from what was luckily already a pretty decent setup. There were plenty of electrical outlets, coax cable in every room and phone lines part of the plans. We only added a few electrical outlets so we would never have to run any power cables around corners (I hate cable clutter!) and then went to town on the data cabling:
I’m a big fan of speed. Especially where networks are concerned. So CAT6 Ethernet was the minimum requirement. While we’ll come to wi-fi later, nothing I’ve seen commercially available will beat a wired connection. So we put at least two RJ-45 sockets into every room.
 Not knowing where we’d put the TV on the wall, we set up two walls in the living room for easy placement. To me this means putting all the necessary outlets (Power, Cable TV and Ethernet) right up the wall so they are hidden behind the TV when that is mounted. This way all the cables just vanish from sight. As we don’t need two TVs in the living room, we have the second row of outlets hidden behind a picture frame.
If there is one thing I’ve learned from experience: There is no substitute for planning when it comes to setting up a network. Getting the physical layout and architecture right the first time will save you a lot of money, time and nerves in the long run. So I did not want to compromise when it came to my home setup.
 All CAT7 cables run into our storeroom. There they meet up with the coax TV cable which currently serves as our ISP line.
At the same location I also have the option to access the POTS wiring if I wanted to switch to xDSL. And there is a proper 19†network cabinet. I won’t call it a rack as it is only 9U – then again it fits all the equipment I’ll ever need it to host.

First of all, you’re looking at a Rittal FlatBox DK 7507.110. The enclosure is wall-mounted with just enough space for cleaning (basically making sure our Roomba will fit with no issues).
I use an EQUIP 333293 PDU with some cable modifications: I ran the power cable that enters the enclosure directly into the PDU, replacing the original power cable. At the same time I connected the grounding wires that connect all of the metal parts of the enclosure to the grounding wire that is part of the house electrical installation.
I use an EQUIP 326416 16 port CAT6 patch panel – I only need 12 Ports but I wasn’t able to find a 12 port 19†panel. All CAT6a panels I looked at were 24 ports and I preferred the centered 16 ports on this panel as I’m using small switches with ear extensions. Speaking of switches…
 We have two 10 port Cisco Small Business switches: One SG300-10 as well as an SG300-10PP for 802.3at POE+. I already had experience with the SG300 line of switches from multiple jobs and so far I can absolutely recommend them for any small business / edge switching / home lab use. They basically do everything you can ask of a switch right now up to and including Layer 3 routing. But most importantly, the SG300-10PP is the only rack-mountable switch I was able to find with POE+ that is fanless. It has a 60 Watt power budget which for my use cases is plenty.
Completing the network are my cable modem, a Ubiquity UniFi Security Gateway (USG) and a Ubiquity UniFi CloudKey. Then there is my trusty old Netgear ReadyNAS Pro Business – slightly modified with upgrades to the CPU, RAM and fans. The last part being essential: Replacing the stock fans with some Noctua fans was probably the best upgrade to that system.
I’m considering replacing the current NAS with a smaller 4-bay model in the future. My needs here are relatively simple: All I need is lots of storage along with support for SMB, DLNA and Wake-On-LAN. With progress in ARM based storage devices, I’m seriously thinking about taking the plunge just to get the power needs down. Cooling hasn’t been an issue so far but the room does warm noticeably when the door is closed – as was to be expected with it having virtually no ventilation whatsoever.
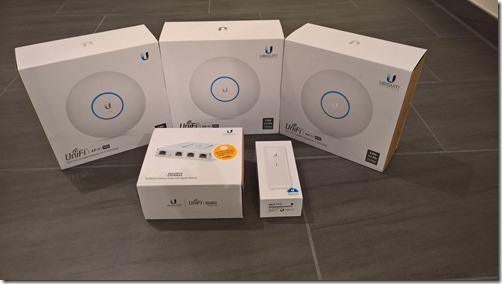
So on to the wireless setup: Having the best wife in the world, I was actually gifted a Ubiquity UniFi AP AC PRO for my last birthday, right off my Amazon wish list. Only there was a problem. Several actually:
– The dashboard is kind of addictive. The amount of information it can give you – without messing about with SNMP, MIB files etc. – is just amazing. I love solutions that just work.
– As with any entrance drug, UniFi really only works when you set up the whole shebang. So I picked up a USG security gateway to get insight into my network traffic on the WAN side.
– This being my place, any dead spots in coverage or drop-off in throughput could not be tolerated. So the single AP was soon joined by two of it’s brothers.
– I’ve come to appreciate single-use appliances. Things designed to do one thing, and one thing only. And do it well. So I’m running the UniFi controller on the purpose built UniFi CloudKey. I originally thought about using my Raspberry Pi but then remembered how much I actually hate caring and feeding a Linux system on a day-to-day basis.
What I ended up with was this:

So how did I set up the Wi-Fi? I’ve been using the UBNT community forum to read up on what works and best practices. Basically the logical network I’m running is rather simple: There is no point in using fancy things like management VLANs around my LAN and while I might set them up for the home lab, everything is just a flat class C private subnet (my provider hasn’t figured out yet how to give me an IPv6 prefix – I wager it’ll take them longer to get that done then it takes Chris Büchler (of pfSense fame and now working at Ubiquity on the Routing & Switching products) to implement IPv6 on the UniFi controller and USG router.
I currently have an open guest network using the UniFi controller to act as a HotSpot gateway using vouchers (Not happy with the open nature of this network, any help in setting up HotSpot 2.0 to get encryption for guests without having to hand out WPA-keys would be appreciated).
And this is how it looks:
 This is a view of the UniFi controller running on my home network.
Where things get tricky is the map view. This may help with planning the deployment of hotspots, you’ll see it’s always a good idea to check with reality:
") This is just the plain view of locations of the access points.
This is just the plain view of locations of the access points. 
What I want is good signal in all rooms as well as fast speeds in all locations that are commonly used by me.
All the UniFi AP AC Pro’s are wall-mounted.
Let’s take a small detour into the ABC’s of Wi-Fi networking:
2.4 GHz is for coverage. 
5 GHz is for speed.
There are only 3 non-overlapping 2.4 GHz channels (1, 6, 11) at 20 MHz channel width. At best this gives you 300 MBit/s linkspeed with a two antenna setup. As 2.4 GHz Wi-Fi will penetrate further, be a good neighbor and don’t use wider channels. Also it is a good idea to turn down the power of the AP so as not to cause interference where you don’t actually need you Wi-Fi coverage anymore.
At 5 GHz, *if* you can use DFS Channels, there are up to 4 non-overlapping channels of 80 MHz bandwidth each. This gives you up to 866 MBit/s linkspeed with two antennas. It is very rare to come across a Wi-Fi client with more than two antennas. Unless you only have drywall, you can forget about getting a useful signal more than one wall away.
There are plenty of rules of thumb about this but nothing beats actually measuring it!
")
Using the free tool Netspot, I made this coverage map of my apartment. In this screenshot I’m showing just the 2.4 GHz coverage. As you can see, the tool gives slightly different locations for the Access Points. It puts them where the signal is strongest – which depending on things like the signal bouncing off surfaces might be quite a bit off: See the bottom right AP which the measurements put right in front of the metal door to the elevator.
On ") the 5 GHz front things look a lot colder. As expected, there is only really a fast connection in the rooms where we actually put the APs. Then again we don’t really need the speed in our guest room.
the 5 GHz front things look a lot colder. As expected, there is only really a fast connection in the rooms where we actually put the APs. Then again we don’t really need the speed in our guest room.
So that’s it for this project. Please tell me what you think, any suggestions where I can improve or whatever else comes to mind!
-Jan
It’s been a while since I had any interesting tech that I was actually able to write about. Today, that changed with the arrival of the brand-new Lenovo ThinkPad X1 Carbon. For the international audience, I will write this and maybe a few follow-up articles in English as opposed to German.

Specs wise, it’s pretty standard with the 3rd gen Core i5 3427U processor, 8GB of RAM and 256GB SSD. The Ericsson WWAN card is included, the USB 10/100 Mbit/s Ethernet adapter is not. I’ll have to check if and when I can expect delivery of that. I did not order from Lenovo directly, so I will have to go through my dealer for that. Anyway, enough has been written about the specs and parts in other places.

Because I haven’t seen any other shots of a final system board, I included my own. As you can see, the RAM is soldered to the board. Opened up, more than half the system is taken up by its battery. Just to make clear: This was “just for funâ€, there were no build issues whatsoever with my model that would have necessitated opening up the system. As far as build quality is concerned, this machine easily beats any one of the older ThinkPad models I owned or worked with. For the record: X21, T42p, T60p, T61, T400, T400s, T500, T410, T510, T420, X220, T430. Yes, I know that’s a lot but I spent quite a while in recent years supporting a fleet of ThinkPads for my last employer.
The X1 Carbon has probably the stiffest base I’ve ever experienced on a laptop. There’s less give than I have in my 11†MacBook Air (2011) which is impressive, considering the X1 has a much larger chassis that could bend. Lenovo did change the color finish on the bezel and palm rest surrounding the keyboard. It is now much closer to the soft-touch finish normally found on the display cover. Oddly enough, I prefer its texture and softness to that of the new all-glass touchpad. Now, the latter is a big improvement to the touchpads found previously on ThinkPads (even the newer ones that started to be introduced with T400s). Its somehow not quite as smooth as you would expect from a glass touchpad – something of a problem for me as I have dry skin and I noticed it had something of a sandpaper effect on my fingertips. For those who absolutely have to use a touchpad: The ones build by Apple are still the top of the crop. This being a ThinkPad however, there’s still the good-old TrackPoint and it hasn’t changed a bit.
The LCD screen is of the TN persuasion and it’s a pretty good one. Colors are vivid and the contrasts are excellent to my eyes. Other people have noted the LCD grid. The effect indeed is noticeable if you have really good vision and you’re looking at a mostly white screen (e.g. MS Word). I mostly just noticed it because I read about it and looked for it. In regular use with what I’d call an ergonomic distance between your eyes and the screen it’s much harder to see, certainly if you don’t have perfect eyesight like me. The resolution is still spot on, 1600 by 900 on a 14†screen is the sweet spot for me. It’s enough to enable some multitasking on the road while keeping the machine portable. For serious work I still recommend a 24†or larger external screen.
I can’t say I spent too much time with the stock Windows installation. It’s not as bad as other PCs I’ve seen (HP, Sony) but it’s probably not worth keeping if you are the least bit technical and know how to install Windows and drivers. It’s a long shot from the Microsoft signature builds. Anyway, I wasn’t going to have Windows 7 on this machine anyway and progressed to installing Windows 8 Professional RTM on it:

Here’s a couple of pointers that might help you avoid some of the stumbling blocks I met:
Some general early impressions about system performance and such:
That’s it for my early thoughts. The X1 Carbon for me is the perfect workhorse computer right now. I don’t need computationally intensive applications on a daily basis (that’s what servers and desktops are for!) and I appreciate the portability. I’ll probably buy a second power supply and I’m seriously considering the USB 3.0 dock.
Otherwise this computer is what I always thought the Macbook Air should have been: Black, no-nonsense, non-glare, non-shiny, all serious, with a great keyboard and a little red dot right smack-dab in the middle where it belongs.
-Jan
This is an updated and extended how-to, in which I will explain how you can install VMware Server 2 on the Netgear ReadyNAS PRO / 3200 / 4200 platform:
It applies to the following versions:
For the last couple of months, I have been part of the betatest for the Netgear ReadyNAS PRO Business Edition. As the product has been released, I can now tell my story.
First of all, some history:
I’ve been a user of the PRO’s predecessor, the ReadyNAS NV+ for almost 3 years now. Its primary use has been that of a file and media streaming server. I have also had another NV+ in use as part of my employers server infrastructure, where it also works as a file server for archive and storage.
There were a couple of things that made me choose the ReadyNAS NV+ over its competition, but mostly I was convinced by reviews such as this, along with user feedback in forums and comments. For the most part, I can truthfully say I have been very happy with the NV+, as it has been rock-solid. There were no crashes or problems and configuration – at least for my usage scenario – has been dead simple.
There was only one minor gripe: Once you have a couple TBs of data, or your job includes moving hundreds of gigs of data on a regular basis, network throughput really comes to the foreground. With the NV+, under most if not all real-world applications, throughput maxed out around 30MB/s. This might not sound all that bad, considering most people still use 100Mbit networking, which tops out at around 12MB/s – but Gigabit Ethernet can move 120+MB/s and I’m an impatient fellow.
Along comes the ReadyNAS PRO, which is in most user regards an evolutionary step over the NV+:
Everything else, from a user perspective is pretty much the same:
So why choose the PRO over its much cheaper predecessor, the NV+? One word: Performance!
The ReadyNAS PRO is by far the fastest networking device I’ve seen yet. To be honest, I have no idea how fast it really is, and from my experience during the beta phase, no-one else really knows either.
Why is that, you ask? Well, it turns out that no-one within the group of testers had a client available that could serve data at faster than gigabit speeds. I was in fact planning on using IEEE 802.3ad to hook up a much faster server as well as the PRO to my network – but incompatibilities with my network hardware kept me from testing it. I’m still trying to track down some Cisco hardware to have another go at this but for the time being, I will refer you to the official testing data from Netgear, which I can personally tell you to be true.
In use, the limiting factor for me has been my client computer (a ThinkPad T61 with a 200GB 7.200rpm Hitachi HDD), where I’m regularly seeing transfer rates between 50-60MB/s – a huge improvement over the NV+ which gave me 30MB/s only on a good day (I had some issues with data fragmentation as the NV+ was nearly constantly filled to max capacity…). On a side note: If you use Vista, *don’t* have any kind of media files or players open because that just murders network throughput (more on this issue here).
So what else is there to say:
The one factor that lead me to the ReadyNAS line of products was its proprietary X-RAID technology. Let me explain about this for a short while:
RAID stands for Redundant Array of Independent Disks. This means that a disk failure will not lead to you losing data. There are basically three types of RAID terminology you need to know about:
There are also other kinds of RAID you can use like RAID 10, 50 or 60 but I won’t go into those as they don’t really apply for a NAS box. Back to the topic though: Typically, once you’ve decided on one version of RAID for your setup, you cannot go back. You cannot upgrade to larger disks, you cannot change much of anything whatsoever. That is, unless you have X-RAID:
The ReadyNAS has this trick up its sleeve which allows you to go from one disk to two (when it sets up a mirrored RAID 1 volume), then three (converting the RAID 0 to a RAID 5), up to 4 (with the PRO 6) disks. During the latter stages, all the NAS does is to expand the volume and restripe the parity information so it is evenly spread among disks. Netgear calls this horizontal expansion.
Once you hit the maximum amount of disks you could put into your box, there was only one way to upgrade to even higher capacity: Swap out each disk one-by-one for a larger capacity model, wait for resync, and once all the disks have been swapped, wait for the volume expansion to take place. With the ReadyNAS PRO, X-RAID2 is adding a new trick: vertical expansion. The moment your drive swaping allows for a redundant setup of two larger capacity disks, the NAS will expand the volume to include whatever new diskspace is available in a redundant setup. What’s that mean? Here’s an example:
Say you have 4 500GB hdds already in place and you need even more space, adding two 1TB drives would usually have lead to an additional 1TB of space – because in a RAID5 volume, all disks can only as much to the volume as the smallest disk in the array. With X-RAID2, the ReadyNAS PRO detects that there are two drives with an unused capacity of 500GB each, which it then uses to extend the volume by another 500GB, which are in a mirrored setting. Neat.
Then again, who cares? In reality, most people will probably populate the NAS with all the disks they plan to put in it from the start and never think about it again until something breaks or they run out of space. Only then does this feature become important. What’s it good for then? Peace of mind!
I have pretty much summed up most I had to say, except for one thing: It’s quiet. Really quiet. Netgear did a great job designing the hardware for this thing as all my disks have been at below 40°C and I’ve had this thing on my desk without the fans feeling annoying.
To sum it up: If you’re looking for a fast, stable and userfriendly device to store your data, the ReadyNAS PRO will be the best choice currently on the market. It may be more expensive than its competition – but ease of use and maturity do count for something, most certainly in a business environment. Finally, a five year warranty along with the stellar support from the ReadyNAS team over at www.readynas.com/forum should put your mind at ease… it’s certainly convinced me.
-Jan Olbrecht
My acknowledgements and thanks go to the ReadyNAS PRO beta tester group and the Jedi Council over at the ReadyNAS Forum.